Agent objects
You can add an agent to the canvas by selecting the agent icon in the toolbar, or using the shortcut "A". There is no limit to the number of agents that can be in—or active—in a canvas, but running multiple agents concurrently will accelerate your credit usage.
Agents create output within a standard frame. All related functionality is available (e.g. creating a link to the frame in a sticky with a @ identifier).
The agent has four states:
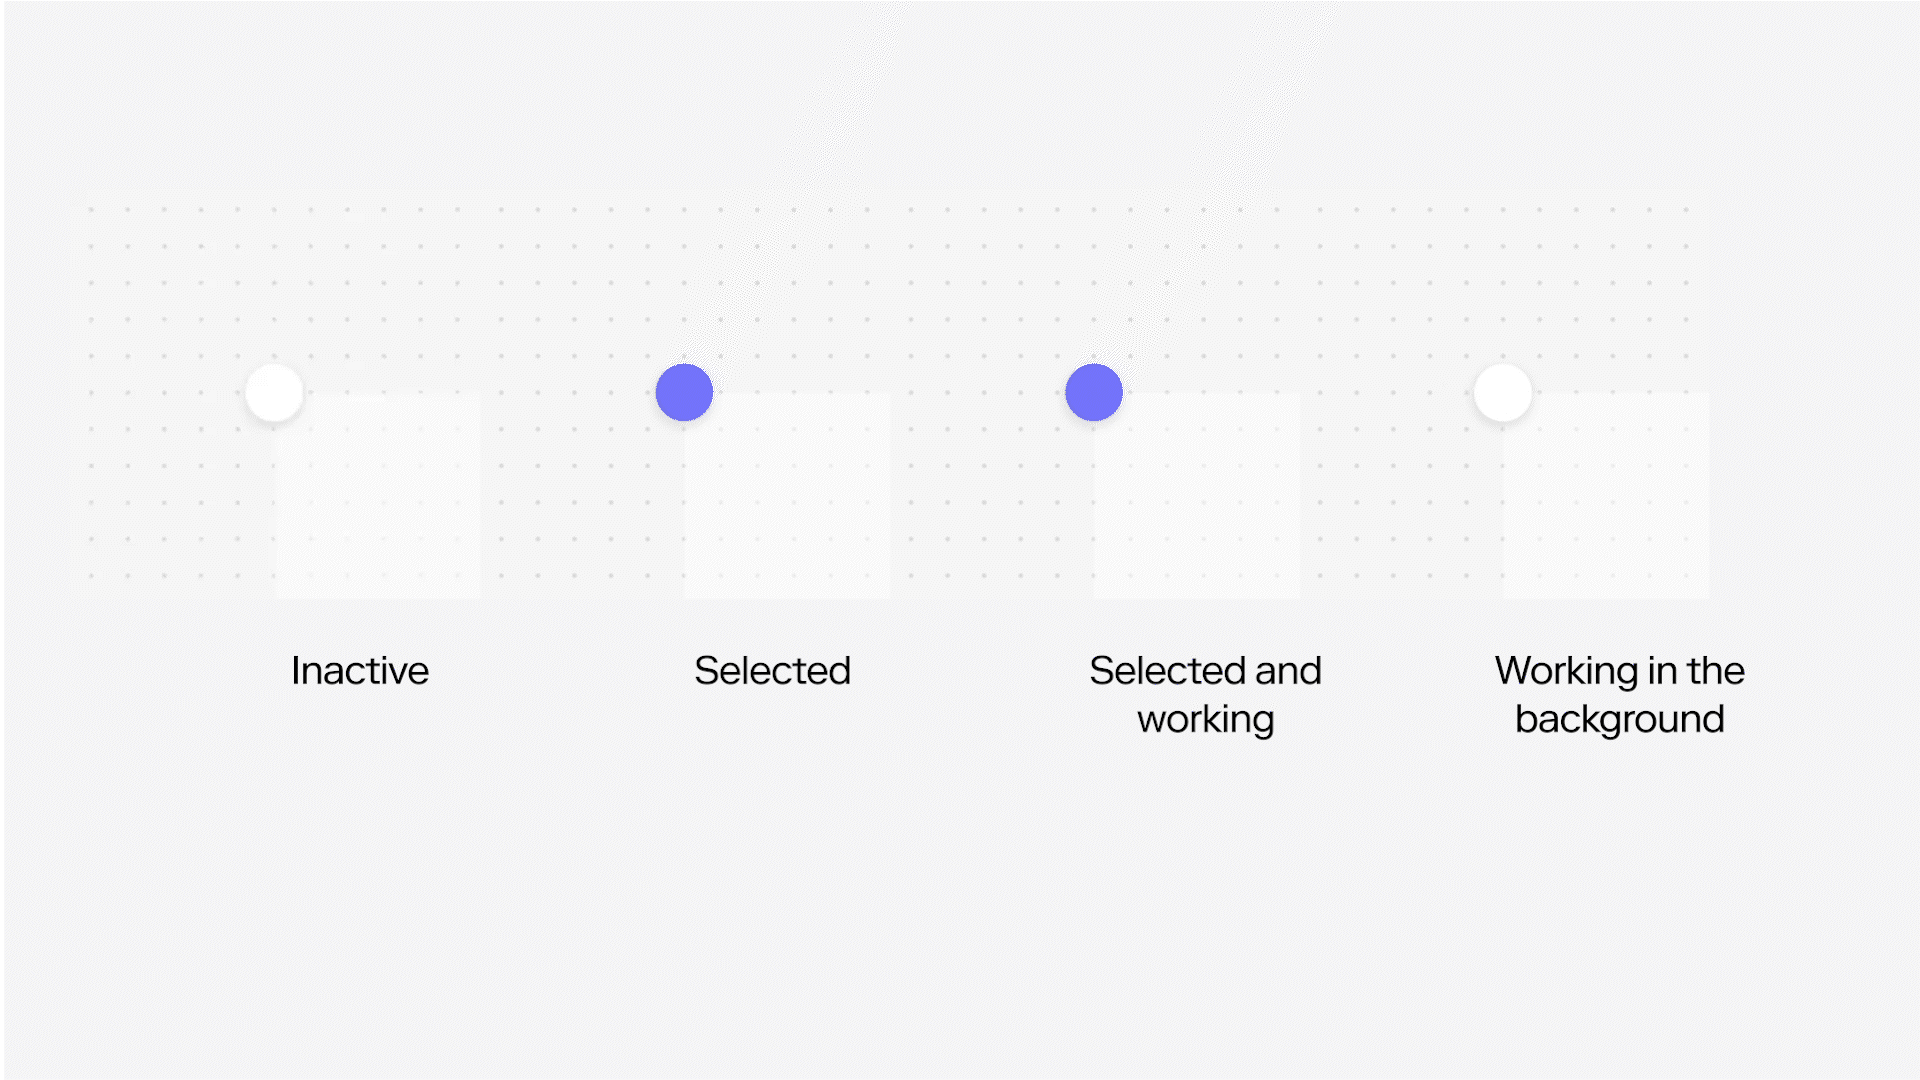
Agents will continue working until they hit an end state whether they are selected or not. They will continue working even if the browser tab is closed, and no-one is in the canvas.
Currently, agents have a maximum process time of 1 hour at which point they will be stopped.
The agent panel
When you have an agent selected, it is shown in the left-side panel.
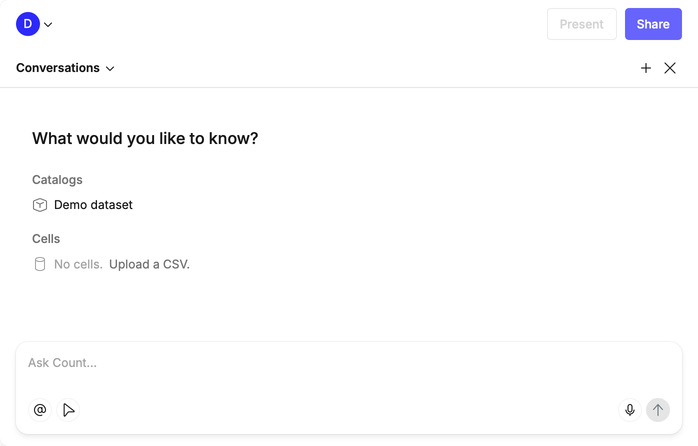
- Clicking Conversations in the top-left allows you to switch between all of the agents present in the canvas (including those created by other users).
- The plus (+) icon will create and select a new agent.
- The cross (x) icon will close the panel leaving the agent inactive and deselected
Input and context
Count’s agent has access to all data sources within the canvas and can autonomously locate relevant data across your catalogs and databases. However, it cannot read other cells in the canvas unless they are explicitly referenced (use @ in the chat to mention a cell or data source). Additionally, the agent is designed for safety: it will never execute a query against your database without your direct approval.
The agent panel will show all available and compatible cells, databases and catalogs.

When working with a catalog, the agent can read:
- The full contents of any
*.dataset.ymlfiles - The full contents of any
*.view.ymlfiles - The
AGENTS.mdfile
This includes both the structured fields (such as measures, dimensions, joins, and metadata) and any written comments or documentation inside those files.
You can also provide agent-specific context directly within Count at different levels:
- Workspace-level context — applies across your entire workspace
- Catalog-level context — applies to a specific semantic layer catalog
- Project-level context — applies within a specific project
Find out more about context best practice here.
Querying the agent
To start the agent working, simply type in your query and add some input data. You can do this by either:
- Clicking on a cell/catalog in the list as shown above
- Clicking on the cursor icon in the prompt input, selecting, or range selecting canvas objects and then clicking "Add n objects to context"
- Clicking/typing @ and then selecting or typing the name of the cell
You can technically use the agent to generate data without providing input, for instance by asking it to generate an example dataset to a specification.
Using the cursor icon also allows you to select non-data cells like stickies and text. This lets you create shared textual context within a canvas for use by the agent. For instance, definitions, terminology, or even a list of questions you want the agent to address.
Inspecting the agent's progress
Once an agent is running, you (and other users) can see its progress in the panel.

This will show atomic steps the agent is taking. These might be canvas actions like editing or where it is thinking. You can click on the disclosure arrow (>) to expand and understand these steps.
It is completely normal to see red error steps. The agent will—like any LLM or analyst—make syntax errors in SQL statements, or run into analytical walls. it will then continue to iterate and respond to those errors.
Editing the agent's output
The agent creates cells and objects in the canvas using the same tools and functionality that human analysts have access to in Count. As such, all cells can be edited, built off, or deleted.
You can also move cells outside of the agents frame, and work with them as if they were any other cell.
If you move a cell outside of the agent's frame, it is still aware of it as something it created. This means that if you subsequently ask a followup query, the agent may make changes to that cell.
For instance, moving a visual out of the frame, and then asking it to make changes to that visual will effect or recreate it.
In most cases the agent will favour SQL cells overs low-code table cells. However, by default it hides the cell input which makes them look like tables. Select the cell, and toggle "Show Input" to expand the generated SQL query.